Volume Character Controller
Namespace: Raymarcher.Toolkit
The toolkit library features an out-of-the-box character controller for volume boxes.
The Volume Character Controller enables you to move around on the target volume box with a simple collision system (capsule-based).
This character controller specifically works with Raymarcher's Tex3DVolumeBoxes that contain tex3D data.
Currently, it supports only gravity-based movement, and flying character controllers are not supported (yet).
You can easily create a volume character via GameObject/Raymarcher/Toolkit/VolumeCharacterController.
To use the character controller, it needs to be initialized first. There are two ways to initialize the controller:
1. Let the character controller auto-initialize on start. Just assign the target volume box gameObject.
2. Initialize the character controller manually via script.
The target volume box must contain a 3D render texture with a Raymarcher-friendly resolution. There are six allowed volume resolutions in the Raymarcher: x16, x32, x64, x128, x256 and x512.
Finally, you need to move the volume character.
Raymarcher includes example content that provides a simple 'move' script with legacy input (RMSample_VolumeCharacterControllerInput), or you can create your own input system for driving the character controller.
Please refer to the API below for more information.
Properties & Fields
// Player definition
public float playerHeight;
public float playerRadius;
public float movementSpeed;
public float gravityForce;
public float maxFallingSpeed;
public float jumpForce;
public float heightSmoothing;
public bool useAcceleration;
public float accelerationSpeed;
// If enabled, the position of the volume character controller will repeat only within the target volume box even if the controller is outside of the bounds
public bool moduloWrapWithinVolumeBox;
// Is the controller properly initialized?
public bool IsInitialized { get; }
// Is the controller grounded? (touching any voxels below)
public bool IsGrounded { get; }
// Is the controller's head-tip colliding with any voxel above?
public bool IsHeadTipCollidingWithVoxel { get; }
// Is the controller colliding with any voxel obstacle? (touching any voxels around except the above/below)
public bool IsCollidingWithVoxel { get; }
public Vector3 CurrentAccelerationVelocity { get; }
public float CurrentMoveVelocity { get; }
public float CurrentHeightVelocity { get; }
public RMSdf_Tex3DVolumeBox TargetTex3DVolumeBox { get; }
Methods
// Initialize the controller with an existing target volume box and assign a new volume texture to the volume box
public void InitializeCharacter(RMSdf_Tex3DVolumeBox targetTex3DVolumeBox, Texture3D targetTex3D)
// Initialize the controller with an existing target volume box (the target volume box must have a 3D render texture assigned)
public void InitializeCharacter(RMSdf_Tex3DVolumeBox targetTex3DVolumeBox)
// Update the currently initialized controller with an existing new target volume box (the target volume box must have a 3D render texture assigned)
public void UpdateCharacter(RMSdf_Tex3DVolumeBox targetTex3DVolumeBox)
// Move the currently initialized controller with the given raw move axis
public void MoveCharacter(Vector3 rawMoveInputDirection)
// Make the controller jump
public void JumpCharacter()
// Sample collision directions around radial axis (check whether the controller is colliding any voxel - returns normalized direction towards collision hits)
// The size of vector array equals to iterations
public Vector3[] SampleRadialCollision(int iterations, float addRayLengthWorldspace = 0)
Tips & Tricks
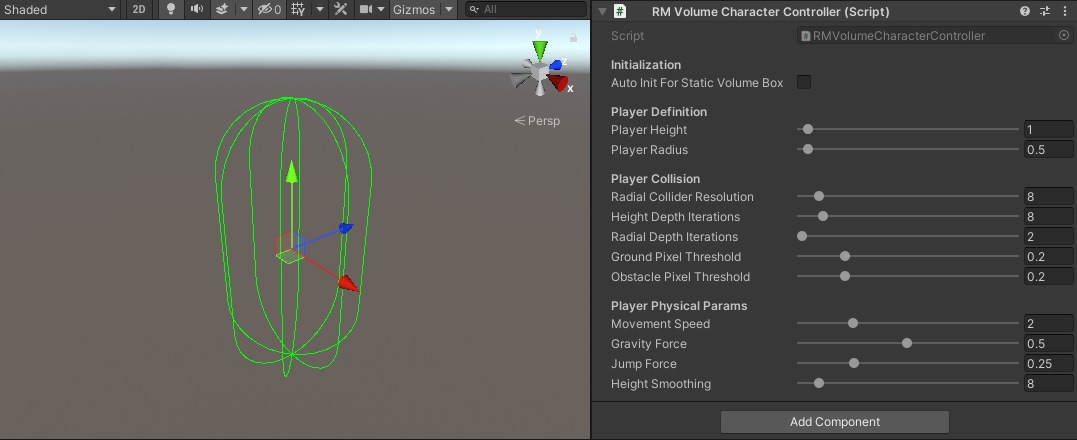
The Volume Character Controller features a few sliders that need to be properly initialized for effective use.
The controller detects collisions based on the 'radial collider resolution' value, indicating how many depth samples the controller should cast to the volume box.
Keep in mind that a higher number consumes more performance, so it's recommended to keep the collider resolution and depth iterations as low as possible.
The sliders include:
Ground & Obstacle Pixel Threshold: These sliders tell the depth sampler the minimum pixel value required to detect a collision.
When the pixel exceeds the specified value, a collision is detected.
A higher pixel threshold results in fewer voxels being detected for collision.
The ground pixel threshold manages the controller's height position, while the obstacle pixel threshold handles the 'push-from-the-obstacle' position.
If the 'push-from-the-obstacle' is a bit jagged and not smooth, you can use a sample script from the example content called 'RMSample_CameraSmoothFollow'.
Assign this script to your target camera, set the camera's lock-point to the 'target' field on the camera follow script, and the radial collision detection should be smoother!